
The sun is out in Omaha, Nebraska and everyone is out soaking it up! With the weather so hot and dry, it’s easy to forget about your home’s plumbing. Basement floods and frozen pipes seem like a distant memory. Summer can bring its own issues however, and even if your plumbing is flawless, it takes work to keep it that way! Put in the work now and call Harvey’s Plumbing and Drain to schedule a checkup
, so you won’t be left wet and cold this winter.
Let Guests Know How to Treat Your Pipes
Summer is the time for family visits, parties, cookouts, and maximum hosting. Your home’s pipes can bear the brunt of that burden. Every home is different, so it’s important to be explicit with guests about what your pipes can and can’t handle. Feel free to put up helpful notes like, “This toilet only flushes TP!” or “No Bones or Grease Down the Disposal”. Also, make sure to have bathroom trashcans in obvious places so people don’t try to flush anything precarious. In the kitchen, make sure to have compost, trash, and recycling easily accessible as well.
Save Water by Switching Out Old Appliances
Omaha summers always tend to be on the dry side and this one is no exception. As such, it’s important to conserve water however we can. Not only will that leave more water for fishing, kayaking and swimming, but it will save you money on your water bill as well. One easy way to reduce water usage is to swap out old appliances. Old, inefficient showerheads, faucets, toilets, even dishwashers and washing machines can waste an astonishing amount of water. Switching them out with newer, more efficient models can save water and money.
Maintain Your Washing Machine and Dryer
All the swimming, boating, and running around outside this summer can pretty much guarantee one thing: your hamper is piling up fast. To keep up with it, your laundry loads have probably been larger, and more frequent than in winter months. Thus, proper maintenance of both your washer and dryer is always smart in the summer. Start with your washer’s hoses and valves. Washing machine hoses are a huge source of leaks in summer months, so making sure there are no kinks or loose valves can help avoid a bigger costlier problem before it happens. Also, be sure to check and clean your lint trap regularly, as dryer fires also increase in the summer time and lint blockages are a major cause.
Take Care of Your Hot Water Heater
In the cold, wet winter, your hot water heater likely works overtime. Now that it’s warm and dry however, your hot water heater is likely breathing a sigh of relief. Since it’s not in such high-demand, now is a great time to clean and maintain this costly and important appliance. First, turn that puppy down. Showers don’t need to be as hot, nor does the laundry for most loads, so turn the temperature down a bit and save you some money on your power bill. If you’re going on vacation, turn it way down, otherwise you’re paying to heat water no one is going to be using. In addition to turning down the temp, the summer is a great time to clean and test your water heater as well. You can do this by draining it, cleaning it, and checking out the internal elements to make sure they’re in good shape. Or, you can just call Harvey’s Plumbing and Drain - they work on hot water heaters, too.
Plant and Water Your Garden Strategically
With all the rain we get in the winter, it’s easy to get carried away when planting and overburdening your water supply. It might be too late to re-plan your garden, but you can get the most out of your watering. Make sure to water early in the morning, or later in the evening. Not only will you avoid burning your plants with water during the hot part of the day, but you’ll avoid wasting water that will get quickly evaporated by the hot sun as well. When you are planting, try and plant drought resistant crops for ground cover instead of grass.
If you put in the time now, you’ll thank yourself later. The summer is busy, but don’t let it keep you from being proactive about your plumbing!
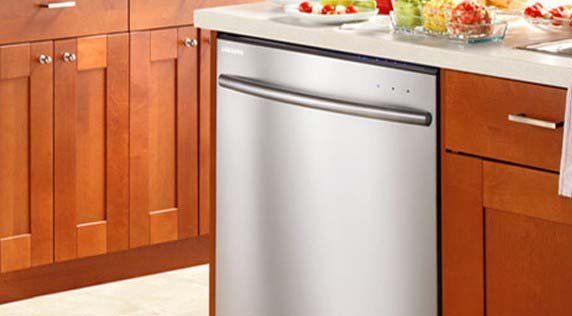
So, you’ve finally decided to get a new dishwasher. Now for the fun part; picking one out and installing it. Typically broken down into three price ranges: budget, midrange, and luxury, you’ll find dishwashers can set you back anywhere from $400 to $700. Keep in mind, the closer you go toward the luxury end, the tougher the installation will be.
When it comes to installation, you have two basic options: do it yourself (DIY) or professional installation. Caution: the DIY option is not for amateurs. If you are replacing an existing dishwasher, installation may include minor adjustments to countertops, wiring, or plumbing.
Here are some things to watch out for:
- If you’re replacing an old dishwasher with a new one, the installation will be easier than if you’re installing one for the first time. The dimensions of the cabinet opening for the new dishwasher are of utmost importance. If the opening is too large, noisy vibrations are likely to occur. If it’s too small, the new one will either not fit at all or will be so tight that cramming in all the parts and pieces may do some damage. This can be especially problematic if you’re stepping up from a basic model to a luxury model with more features.
- Needless to say, the power to the kitchen should be turned off prior to installation to avoid “shocking” surprises. The water supply lines under the sink should be turned off for installation unless you want to go for a swim.
- It’s important that the dishwasher is level and in line horizontally with the countertop. There will be metal legs on the bottom of the dishwasher that can be adjusted for raising, lowering and leveling the unit for proper positioning. Brackets are included on the top of every dishwasher for use in attaching the unit to the bottom of the counter top.
- Almost all new dishwashers will include all the parts you need to install, except for the dishwasher 90° connector which you can purchase at a plumbing supply or home improvement store. Be sure the type and size of the dishwasher 90° connector is the correct one for your particular dishwasher.
- Also, often not included with dishwashers is the water supply line. You can pick that up where you purchased your dishwasher - we recommend a wire mesh line instead of a rubber one.
- An improperly installed drain hose is by far the most common defect found in dishwasher installations. The drain hose coming from the dishwasher must tap into your sink drain line above the P-trap (also called a J-bend). If this is not done properly, sewer gas can enter your home through your dishwasher.
- Another common error is failure to make sure the drain line makes a “high loop” in the cabinet space underneath the kitchen sink. It’s required by code in many states and is a requirement stated by every dishwasher manufacturer. An alternative to installing a high loop is to install an air gap at the kitchen sink – it’s a device that mounts on top of the sink. Some people feel this air gap device is unsightly so the high loop is preferred by most homeowners.
- It’s very important to make sure the clamps securing the dishwasher’s drain line, to the drain line, going to the sink’s drain pipe, are properly installed. If not, you’re sure to have a major leak.
- After the installation is complete, turn the water and electricity back on, check the water flows and run the dishwasher through at least one cycle. With a flashlight, be checking for leaks around and under the dishwasher and the plumbing connections under the sink.
Early detection of a water leak can save you money and avert potential disaster. If you think you may have a leak, follow the steps below to confirm and identify its source.
1. CHECK YOUR WATER METER
One of the best ways to tell if you have a leak in some part of your plumbing is to check the water meter. To do this, you will first need to turn off all the water in your home. Shut off all faucets, and make sure the dishwasher and washing machine are not running. Next, watch the small white triangle in the center of the meter to see if it is moving. If it does, you likely have a fast-moving leak. If the meter doesn't change immediately, wait two hours and check it again. If it has moved despite all the water being off, you may be dealing with a slower leak. The leak could be anywhere after the meter, or even underground.
2. CHECK EXTERIOR USAGE
Leaks don't just happen inside the home; they occur outside as well. Check your outside spigots by attaching a garden hose; if water seeps through the connection while the hose is running, replace the rubber hose gasket and check to see all connections are tight. Consider calling a professional once a year to check your irrigation system if you have one. A system with even a small leak could be wasting thousands of gallons of water per month.
3. ISOLATE THE LEAK
Step 1- Find the house (main) shut-off valve on the water supply riser, generally located in the front or on the side of the house below the hose bibb, and turn to the "off" position.
Step 2- Look at your plumbing setup. Do you see any water supply lines that bypass the house shut-off valve? If so, turn the shut-off valve to the "off" position as well. Note: a small amount of water may "squirt" from the backflow prevention device when you turn "off" the valve.
Step 3- No other areas of your property should have water flow. To verify you may want to:
• Turn on a house faucet. Water flow should stop.
• Run your irrigation controller. You should not have water flow to the landscape.
• Press or push the auto-fill as if to trigger water flow into the pool. No water flow should occur.
Step 4- Turn the shut-off valve(s) back to the "on" position.
CONSERVATION TIP #107
Check for toilet leaks: Toilets are notorious for their silent leaks and can steal thousands of gallons of water. Put a few drops of food coloring in the tank. Do not flush. If the toilet is leaking, color will appear in the bowl within about 10 minutes. Check the toilet for worn out, corroded or bent parts, especially the flapper valve. Most replacement parts are inexpensive, readily available and easily installed. Flush immediately after completing test, since food coloring may stain the tank.
Plumbing Repair Tips – Harvey’s Plumbing & Drain
Harvey’s Plumbing & Drain is a family owned and operated business serving the Omaha Metro area. The company offers a 100% satisfaction with all of work and services, upfront pricing, and friendly service for several kinds of home and business plumbing needs. They provide homeowners with tips and solutions to avoid any plumbing problems. Here are some of the basic repairs that homeowners can do can include fixing leaky faucets, stopping a toilet from running constantly and changing out some of the plumbing fixtures in your home. More complicated projects usually require the help of an experienced local Omaha plumber.
All homeowners should be aware of the importance of keeping the plumbing in their home properly maintained. Regular inspections and routine maintenance are key to avoiding any problems - but any problems should be dealt with immediately before a small problem becomes a larger one. Understanding the basics of the home's plumbing is the best way to start.
Running Toilet
The number one water waste can come from a runny toilet. This can be caused when the flapper is not working properly. A new flapper kit can be purchased and installed in a very short amount of time by the homeowner.
Drains
Drainage system is the backbone of your homes plumbing system, and a problem with drains can cause a wide range of issues. To treat a drainage system well, take care not to pour any fats or cooking oils down them, as over time the fats harden and create blockages. All drains should also be fitted with strainers, to prevent soap, debris, hair and food scraps from building up in the system.
Shower Head Clogged
Water is considered to be hard and over time, it is pretty common to see mineral deposits in shower heads. A trick to open the clog is by using warm vinegar and an old toothbrush. Another method is to remove the shower head and submerge it in a bowl of warm vinegar for about an hour. Most of the mineral deposits should dissolve. If any remain, use an old toothbrush to gently scrub away the remaining deposits. Rinse the shower head and re-attach it.
Repair a Leaky Faucet
First; determine whether the leak is coming from the hot or cold faucet. Also check whether the water is leaking from the tap or the handle. Turn off the water at the shut-off valve located just under the sink. Open the faucet to drain out any remaining water. Close the stopper in the sink bowl and place a towel in the sink to protect against scratches or chips.
Remove the decorative top from the faucet handle. Next unscrew the exposed screw and remove the handle. To remove the stem assembly, turn the locknut counterclockwise with a wrench and lift the stem assembly out. If it sticks, try turning it counterclockwise to loosen the stem. At the bottom of the stem assembly is another screw. Remove it and take off the washer underneath.
Take the washer from a local hardware store and purchase an exact match to replace it. If the screw looks worn, replace it with an exact match as well. Clean any corrosion off the stem before replacing it. Replace the washer and screw and reinstall the stem. Put the locknut back on and attach the faucet handle. Replace the decorative cap and turn on the water at the shut-off valve. Turn the faucets on, then off and look or listen for any drips.
Jammed Garbage Disposal
A jammed garbage disposal is high on the list of common plumbing problems. Many people lose the nifty key that comes with the garbage disposal to help unjam it. Fortunately, an Allen wrench can be used to unjam a garbage disposal. At the very bottom of the disposal there is an opening to insert the key. Using a 1/4 inch Allen wrench simply turn in both directions to free the motor.
There are many plumbing tasks that a homeowner can take on themselves. DIY fixes are common and many are easy to do - but there are also many projects that require a professional plumbing service. There are lots of things to do at home to keep various plumbing systems in tip-top condition. Of course, Harvey’s Plumbing & Drain is always on hand to assist with any plumbing problems, be sure to call 402.943.6700 today.
You can also check us out at www.harveysplumbingomaha.com.
Harvey’s Plumbing & Drain gives homeowners tips to prepare their home for spring plumbing issues.
For more information call Harvey’s Plumbing & Drain
- Check the bathrooms – Check the toilet for leaks by placing a few drops of food coloring into the tank. If the water in the toilet bowl changes colors after 30 minutes, that is a sign that there is an issue with the components in the reservoir. It is wise to call a licensed plumber to diagnose the problem and repair it correctly.
- Protect the sewer line from tree roots – spring showers may bring May flowers, but they also can cause major issues with tree roots blocking the underground sewer lines. Trees sit dormant during the winter months, but when the weather starts to warm up the tree roots begin to reach out in search of water. It is recommended to have the sewer lines serviced and inspected before the weather heats up and the roots grow into the pipes.
- Inspect all the faucets – A leaky faucet does not only make an annoying drip sound, but it can also lead to higher utility bills. Check for moisture around the outside of the faucet. Since a faucet may have leaks hidden from view, it is wise to check under and around the sink for wet spots or warped cabinetry.
- Test the sump pump – Make sure the sump pump is primed and ready to work. A simple way to check the pump is to pour a bucket of water into the sump pit. The pump should turn on and begin removing the water out and turn off automatically when it is complete. If it is discovered that the pump is not working properly, do not hesitate to call a licensed plumber to repair or replace it.
- Evaluate the hose bib – During the winter the outdoor hose faucet is very susceptible to freezing and cracking. Look at the outside of the faucet and down the wall of the home to see if there is evidence of a leak. This can cause damage not only to the outside of the home but if leaking enough; it can also cause damage to the foundation.For Omaha residents who want a hand inspecting the plumbing of their homes, a professional from Harvey’s Plumbing & Drain can assess the situation and recommend a solution.
For more information call Harvey’s Plumbing & Drain


